
Using an OBD2 scanner is pretty straightforward, even though using a digital tool to diagnose problems with your car may seem difficult at first.
Let’s now see how to use an OBD2 scanner to diagnose any problem with your car.
What is an OBD2 Scanner?
An On-Board Diagnostics (OBD) scanner (or code reader) is a digital device that helps you to monitor the computer system of your car, and diagnoses and reports trouble codes. If something goes wrong with your car’s engine, data about the issue is stored in the form of Diagnostic Trouble Codes (DTC). An OBD-II scanner helps you to read this code and to pinpoint the exact problem in your car’s engine or system.
The scanner needs to be connected to your car’s computer system, and it also provides all the essential information about your car. Once connected, the scanner will automatically turn on the “check engine” light if it detects any issue or malfunction in the engine.
It also monitors your car’s emission control systems and reports if the emission is 150% or more of the federally mandated limits. These code readers/ scanners are so small that you can fit them in your hand.
An OBD-2 scanner comes with a standard 16-pin connector and is compatible with almost all cars produced during the late 1990s or later. OBD-1 scanner is the predecessor of OBD-2, and it was used during the early days of car manufacturing.
While OBD1 technology also has reliable diagnostic capabilities, modern OBD2 scanners come with much better signaling protocols. Be sure to know which of the two is compatible with your car. If you drive a car that was manufactured in the late 1990s or later, the chances are that you need an OBD2 scanner for it.
How to Use an OBD2 Scanner?

Using an OBD2 code reader is simple. We have broken down its use into various steps to help you gain a better understanding of this matter. Let us now see these steps one by one.
1. Source an OBD2 Scanning Tool
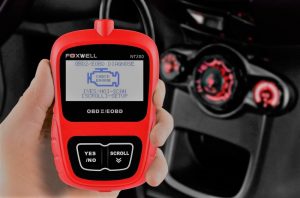
First thing first. You need to purchase an OBD2 scanning tool to get started. This scanning tool can be purchased from any auto parts shop. It is also available in various online stores. If your smartphone has Bluetooth functionality, you can download a mobile application for it as well. This app can help you to interpret your car’s data more simply in real-time.
2. The Diagnostic Link Connector (DLC)
To get going with the scanner, you need to first locate the DLC in your car. It is a 16-pin connector that is usually triangular shaped. You may find this connector on the left side under the vehicle’s dash. However, some cars may provide this connector at a different place in the car.
Hence, you may want to search it online by typing the make and model of your car on Google.
Your car’s manual may also be helpful in this regard.
3. Connect the Scanner
Connect the scanner with DLC. It should be very easy to make this connection. Now turn on your car’s ignition, but keep the car’s engine shut. As the Diagnostic Link Connector gains voltage from the car’s cigar lighter circuit, make sure that this cigar lighter circuit is in fine condition.
Once the connection is made, the OBD2 code reader will communicate with the computer system of your car. You may also see notifications like “establishing data transmission” and “searching for protocols.”
If the screen does not light up and stays blank, the chances are that the scanner is not properly connected with the DLC. Try again to establish a better connection between the two.
This problem is often observed in older cars, as their DLC connectors may not be in fine condition.
4. Vehicle Identification Number
A range of OBD2 scanners is available in the market. Some of these scanners will automatically scan and detect your vehicle’s Identification Number (VIN) and other basic information.
It also depends upon your car’s model. For some scanners/ car models, you may need to manually input this data into the scanner.
However, it is not a difficult task either. All you need to do is to enter your car’s VIN along with the model and make of your car.
5. Understand the Menu

Now the real work starts. Locate the menu within the scanner as soon as it is done booting up. Once you open the main menu, you may see systems like transmission, brakes, airbags, or engines.
It will depend upon your car’s model and the particular scanner that you are currently using to scan. As soon as you click on one of the above-mentioned systems, you are likely to see two types of codes (some scanners may also have more than two code types).
Most scanners show codes, that are active codes and pending codes. These are briefly discussed below:
Active Code: If your “Check Engine” light is green; these live codes are responsible for it. These active codes provide information about malfunctions that require your attention. Remember that if your “Check Engine” light is off; it does not mean that malfunction has not occurred. It could simply mean that code setting conditions are yet to occur fully.
Pending Code: It may indicate that at least once the scanner has detected failure of emission control system operations. If the scanner detects the same failure again, it will turn the “Check engine” light on.
So far, you have learned how to look at various codes on the OBD2 scanner. At the same time, you need to be able to understand what the code means. Again, it is not difficult to develop this understanding, but it may require some additional learning.
Let us now look at what different letters and numbers on an active or pending code may mean.
Meaning of Different Letters and Numbers on Active or Pending Code
1. The Letters in the Code
Every code shown on the OBD2 scanner shall start with a letter. This letter helps to identify the part of the vehicle that the code is trying to refer to. You may need to scroll through different menus to see all the letters.
Following are some of the most common letters you’d come across during the diagnosis process:
- P – it donates ‘Powertrain’. The letter P covers the fuel system, engine, ignition, transmission, emission, and a few more.
- B – it donates ‘Body’. The letter B covers seatbelts, airbags, power seating, and a few more body components of the vehicle.
- C – it donates ‘Chassis’. The letter C covers axles, brake fluids, ABS Codes, and a few more components.
- U – it donates ‘Unidentified’. This code covers all other parts of the vehicle which are not covered elsewhere.
2. The Numbers in the Code
Codes such as P0xxx, P3xxx, and P2xxx are generic and may apply to all vehicles regardless of their model or make. Examples of such codes would be P0339, P0328, and P0355 (these codes are discussed in much detail in other articles on this forum).
On the other hand, the P1xxx codes are specific to the manufacturer, such as Toyota, Honda, etc.
The second digit in the code refers to any particular subsystem in the vehicle. For example, the P07xx code would be referring to the transmission of the vehicle.
Similarly, the last two numbers in the code indicate the specific nature of the problem/ issue with the car. For detailed information about these specific codes, you may want to check a codes chart on the internet.
3. An Example
Let us now look at an example of a complete code to see which problem it may indicate. As an example, we are discussing the code P0301 here. We can break this code into its components to fully understand the nature of the problem as follows.
- P = This letter tells us that there is a potential problem with the powertrain.
- 0 = This zero means that it is a universal (or generic code), i.e. it is not related to the particular model or made of your vehicle.
- 3 = The three in the code refer to the subsystem “Ignition”.
- 01 = These two letters mean that the problem is specific to the cylinders. Furthermore, the “1” here indicates a condition of cylinder misfire.
However, the precise nature of the problem is yet not clear, as the problem could be with the worn-out ignition coil, vacuum leak, plug wire, or spark plug.
It is important to remember that a code neither specifies the exact nature of the problem nor does it tell about the defective component. It only gives an idea about the component or part that is malfunctioning. It is up to you or the mechanic to conduct a further diagnosis. It is because a malfunction may be caused due to a fault in another system in many situations. Hence, it is important to be able to interpret the code, and not solely rely on it.
4. The Ultimate Diagnosis of the Vehicle
As a layman, you should use an OBD2 scanner to know if a problem exists in your vehicle and that it requires to be taken to an expert. Precise diagnosis with OBD2 scanners takes a lot of training.
For example, a worn-out alternator or weak battery could set up four or five different codes, depending upon the vehicle components that it may be affecting. Hence, you should not set out to replace parts of your vehicle merely because you saw a code on your OBD-2 scanner.
Instead, your priority should always be to consult a certified technician in an event of any confusion. Otherwise, you would find yourself to be wasting money and time.
5: Resetting the Check Engine Light
So you have seen the code and made necessary repairs, and now want to turn off the check engine light. Or, perhaps you simply don’t want to see the check engine light turned on, as you don’t consider the issue to be requiring immediate attention.
In either case, most OBD-2 code readers allow you to turn off the light from the main menu of the scanner. The light is turned off for a certain time, or until you have driven certain miles. This may vary depending upon the model and make of the vehicle.
Final Words
OBD2 scanners are extremely useful for vehicles manufactured in 1996 or later (for earlier vehicles OBD1 scanners are equally useful). This diagnostic device helps in understanding potential problems with your vehicle by connecting itself to the vehicle’s computer system.
However, finding the ultimate diagnosis with this scanner could be tricky. It is not recommended to start replacing parts just because of a code on your OBD-2 scanner. It is because it may need a lot of practice and training to precisely pinpoint the part that needs replacement. It should be left to the expert technicians to make these final decisions.
An OBD2 device should be used as a mechanism to understand if and when your vehicle requires to be taken to an expert for further understanding of the problem.
Detecting a likely problem is easier, but fixing the problem is a whole different story in most cases. Hence, it is always better to be careful in this regard, and use this scanner only as a tool to understand the overall health of your vehicle.
Attempting to fix your vehicle on your own may end up a loss of time and money, as has been observed in tons of cases.
Also, you may want to familiarize yourself with commonly occurring codes to be able to easily understand the nature of the problem. All you need is to be able to interpret different letters and numbers. You don’t need to memorize different codes, as these charts are easily available on the internet.
We wish you the best of luck with your vehicle, and we hope that having the ability to use an OBD-2 scanner would prove fruitful for you and the health of your vehicle.